more humor. word count?
What is intentional pooling? you may well ask. And I will answer, It is exquisite torture. Then I will actually give you a helpful answer.
Bonnie and Mary, the two owners at Colorful Stitches, both told me that they have gone to great lengths toavoid pooling. Pooling is that unwanted (usually) patterning that occurs when you're knitting with a yarn that has some color variations in it. When the colors start to stack up in odd ways, so that you have big, random blotches of color throughout your project, that's pooling of the unintentional kind.
Some knitters, instead of trying desperately to avoid this kind of stacking of colors, go the opposite route. They try tocontrol the pooling so that it looks attractive. This takes time, patience, a little math, and an insurmountable will to conquer all.
So...Why? Just...Why?
I wish I could tell you that intentional pooling was my genius idea, but actually that's not true. The only reason I know about it is that I spend way too much time on Ravelry.
I don't know how many active Ravelers read this blog, but if you are at all active on the site, you may know that they have a page of featured finished objects that are generally admired by the community. These objects are known as "favorites." If you get tired of admiring other knitters' gorgeous, perfect knits, you can indulge in a little schadenfreude...I mean, sympathy, and go to a different page called "ugh's." As you might expect, the ugh's of Ravelry are all the projects that didn't turn out quite right...
I was looking at ugh's one night, and giggling...I mean, commiserating, and I happened to click on a pair of socks that featured some really horrendous pooling. In turn, this led me to a discussion on the site all about "Pooling - Good and Bad," and that's where I first saw it - a pooling stole by the incomparable Gladys We. I read some of her tutorials about intentional pooling and decided I had to try it. Why? Because it looks beautiful. Because it's a challenge. And because I am out of my ever-loving mind.(One day, I'm going to have an army of squirrels to do my bidding. Why squirrels, you ask? Because they're everywhere...oh, and they'll work for peanuts. HA!)
First Step
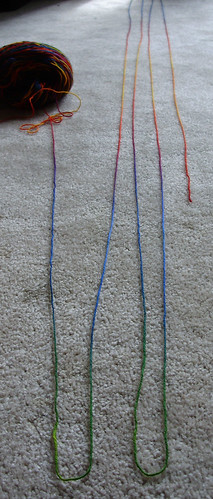
The key to intentional pooling - besides an anal retentive (and potentially borderline) personality - is the right yarn. Yarns that pool need to be dyed across the skein. Like this skein of Into the Whirled Pakkoku Sock -
.jpg)
See how the colors line up? That's what I want.
And then...
I have my yarn, so next I need to determine what Gladys We calls "the magic number." This is the number of stitches I need to cast on to ensure that the colors line up properly. To find the magic number, I engage in a week-long ceremony in a sweat lodge, fasting, until I have a vision. No, actually, I just lay out a single strand of the yarn -

-and mark off the point where I want to start my cast on (that's why there's a paper clip).
Then I do a backwards loop cast on, also known as the "e loop." This is a horrible cast on. If Bonnie ever catches you casting on your projects this way, she will tell you to stop, or she will flinch and turn away. However, it's the only cast on that works well for a pooling project, so it's a necessary (and ugly) evil. I keep casting on stitches until the yarn tail is almost gone, leaving just a piggy tail that I can weave in with a crochet hook later.
Math time
Once I cast on all my stitches, I need to count them, because of course I didn't count them as I went along (what am I, some kind of...knitter who counts things?). My current project has 76 stitches. Next, I pick out a lace motif that works with the number of stitches I have, accounting for a decent number of border stitches.
As it turns out, Miss We's "Pooling Rivulets" pattern works well for me. The lace repeat is 12 stitches plus 4, plus border stitches. 12 multiplied by 5 is 60, plus 4 is 64. I'm working with 6 border stitches on either side (a total of 12), so my lace pattern of 64 stitches + 12 stitches works out to 76. Tada! Magic. Or math. You know, whichever.
Knitting time!
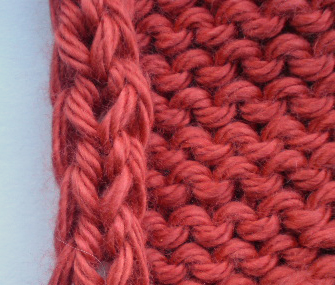
To begin, I knit an even number of rows in garter stitch (knitting every row). Then the real tension starts as I begin knitting the lace pattern. No, I don't mean, "I'm moving in two weeks and I just lost my job and my cat just died," kind of tension (although a little bit of that, too...I live for drama). I mean that I need to adjust my knitting tension every few stitches to ensure that the colors line up, accounting for yarnovers and their corresponding decreases. Some of my stitches are loose and just...hideous, while some of them are so tight that I have trouble muscling them around on the needles.
I tink back (or un-knit) regularly if it looks like my pooling isn't turning out quite right. In fact, I think I tink more than I knit.
Is It Worth It?
Depends on what kind of knitter you are. If you want an easy, mindless project, then no, this technique is not for you (incidentally, I also have another project on the needles right now that is nothing but row after row of stockinette). If you want a challenge with beautiful results that will make non-knitters and knitters alike say, "Wow! How did you do that?" then intentional pooling is a lot of fun.
Take a look at my current undertaking and judge for yourself -

Like a handsome prince in a tower surrounded by thorns and snakes and a mote of acid, this project is worth it to me. Just call me Princess Charming.
For more intentional pooling, check out the Pooled Knits group on Ravelry, or Gladys We's blog.
What is intentional pooling? you may well ask. And I will answer, It is exquisite torture. Then I will actually give you a helpful answer.
Bonnie and Mary, the two owners at Colorful Stitches, both told me that they have gone to great lengths toavoid pooling. Pooling is that unwanted (usually) patterning that occurs when you're knitting with a yarn that has some color variations in it. When the colors start to stack up in odd ways, so that you have big, random blotches of color throughout your project, that's pooling of the unintentional kind.
 |
| One of these things is not like the other... |
So...Why? Just...Why?
I wish I could tell you that intentional pooling was my genius idea, but actually that's not true. The only reason I know about it is that I spend way too much time on Ravelry.
I don't know how many active Ravelers read this blog, but if you are at all active on the site, you may know that they have a page of featured finished objects that are generally admired by the community. These objects are known as "favorites." If you get tired of admiring other knitters' gorgeous, perfect knits, you can indulge in a little schadenfreude...I mean, sympathy, and go to a different page called "ugh's." As you might expect, the ugh's of Ravelry are all the projects that didn't turn out quite right...
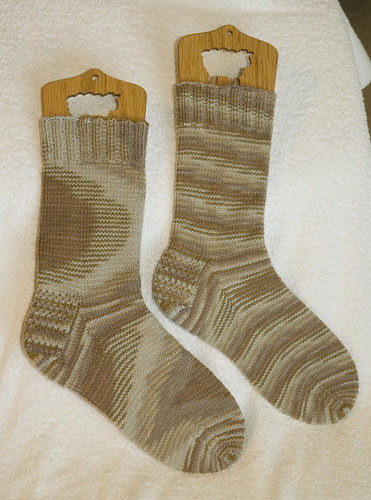
 |
| "My right arm gets cold but my left one gets really hot..." |
 |
| This is my first pooling project. I chose a colorway I didn't like all that much because I thought I might screw it up. |
The key to intentional pooling - besides an anal retentive (and potentially borderline) personality - is the right yarn. Yarns that pool need to be dyed across the skein. Like this skein of Into the Whirled Pakkoku Sock -
.jpg)
See how the colors line up? That's what I want.
And then...
I have my yarn, so next I need to determine what Gladys We calls "the magic number." This is the number of stitches I need to cast on to ensure that the colors line up properly. To find the magic number, I engage in a week-long ceremony in a sweat lodge, fasting, until I have a vision. No, actually, I just lay out a single strand of the yarn -

-and mark off the point where I want to start my cast on (that's why there's a paper clip).
Then I do a backwards loop cast on, also known as the "e loop." This is a horrible cast on. If Bonnie ever catches you casting on your projects this way, she will tell you to stop, or she will flinch and turn away. However, it's the only cast on that works well for a pooling project, so it's a necessary (and ugly) evil. I keep casting on stitches until the yarn tail is almost gone, leaving just a piggy tail that I can weave in with a crochet hook later.
Math time
Once I cast on all my stitches, I need to count them, because of course I didn't count them as I went along (what am I, some kind of...knitter who counts things?). My current project has 76 stitches. Next, I pick out a lace motif that works with the number of stitches I have, accounting for a decent number of border stitches.
As it turns out, Miss We's "Pooling Rivulets" pattern works well for me. The lace repeat is 12 stitches plus 4, plus border stitches. 12 multiplied by 5 is 60, plus 4 is 64. I'm working with 6 border stitches on either side (a total of 12), so my lace pattern of 64 stitches + 12 stitches works out to 76. Tada! Magic. Or math. You know, whichever.
Knitting time!
To begin, I knit an even number of rows in garter stitch (knitting every row). Then the real tension starts as I begin knitting the lace pattern. No, I don't mean, "I'm moving in two weeks and I just lost my job and my cat just died," kind of tension (although a little bit of that, too...I live for drama). I mean that I need to adjust my knitting tension every few stitches to ensure that the colors line up, accounting for yarnovers and their corresponding decreases. Some of my stitches are loose and just...hideous, while some of them are so tight that I have trouble muscling them around on the needles.
I tink back (or un-knit) regularly if it looks like my pooling isn't turning out quite right. In fact, I think I tink more than I knit.
Is It Worth It?
Depends on what kind of knitter you are. If you want an easy, mindless project, then no, this technique is not for you (incidentally, I also have another project on the needles right now that is nothing but row after row of stockinette). If you want a challenge with beautiful results that will make non-knitters and knitters alike say, "Wow! How did you do that?" then intentional pooling is a lot of fun.
Take a look at my current undertaking and judge for yourself -

Like a handsome prince in a tower surrounded by thorns and snakes and a mote of acid, this project is worth it to me. Just call me Princess Charming.
For more intentional pooling, check out the Pooled Knits group on Ravelry, or Gladys We's blog.